
10 Slicer for 3D printing
The 3D printer is purchased, set up and wired. The appropriate CAD software is installed on the computer and the basics of using the program and printer have also been learned. Then we can start with the first own print, can't we? Not quite, because a small but crucial component is still missing to be able to print a model from CAD data: The appropriate 3D slicer software, often just called slicer for the sake of simplicity.
A slicer is, so to speak, the interface between CAD program and printer and enables the actual 3D printing. For those who have never heard the word slicer: The 3D slicer generates a machine-readable code, called G-code, from the CAD data. This G-code is widely used in the world of CNC turning and milling. G-code is a programming language for numerical controls that gives the machines (and thus also the 3D printer) instructions on how to move the axes, the infeed, etc. We have taken a look at slicer software and compiled the most important information and most interesting programs.
➡ Interested in 3D printers? Visits: 3D printer kit / ready printer
What exactly does a 3D slicer do?
The software is first installed on the computer like any other program. The operating system is irrelevant, 3D slicer software exists for all common systems, from Windows to MacOS and Linux.
After successful installation, the slicer software then serves as a translator. Because every 3D printer needs an understandable programming language to convert CAD models into real 3D printed objects.
In order for the slicer software to work, it is fed with the appropriate 3D data from the CAD program. Common formats here are, for example, STL, OBJ or m3F.
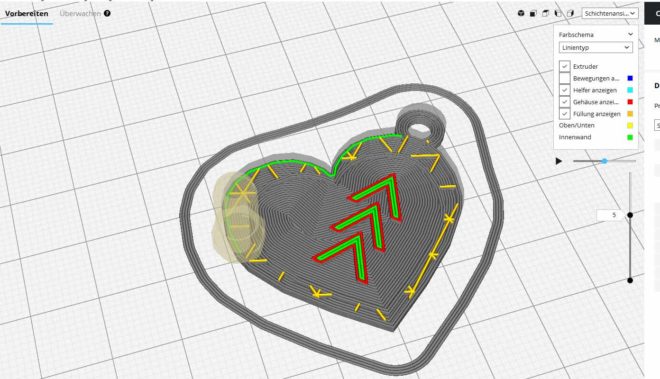
The 3D slicer then uses the data to create a three-dimensional grid model, which is then fitted with horizontal slices. Layer by layer, the 3D model is displayed on the screen, with each visualized layer corresponding to the layer that will subsequently be built by the 3D printer.
Other functions of a slicer software
The subdivision of a 3D model into horizontal layers alone does not make a printable model. Therefore, a good 3D slicer software must do a lot more. For example, good software can simulate the extruder's traverse paths, which allows the user to optimize them. It should also be possible to define the filling density because, after all, it determines how quickly and economically the actual printing can be carried out. Of course, the 3D slicer should also be able to calculate and create support constructions to safeguard unstable constructions or overhangs during printing. Roughly speaking, the better the preparation of the print, the more beautiful the result. At the same time, powerful 3D slicer software can extract maximum performance even from entry-level printers. Of course, the reverse is also true: a top printer is prevented from achieving perfect print results by poor slicer software.
Good software – bad software
So what exactly distinguishes a powerful slicer software from a poor product? There are various criteria that make the difference here. For example, if you want to import detailed, intricately constructed models into the software, you can expect long waiting times during import if the slicer is poorly programmed. Therefore, the import duration plays a not entirely insignificant role in the selection of suitable software – at least for impatient contemporaries.
Good slicers also have the option of visualizing the models read in. These can thus be rotated and enlarged. This feature is especially relevant if the CAD data has been downloaded from Thingiverse and Co. and has not been viewed in CAD software beforehand. Furthermore, good slicers have tools that can detect and repair errors in the model. This prevents the printed model from having unsightly holes or structural defects later on, or even ones that impair its function. And last but not least, a good slicer software should of course be designed to be user-friendly. Especially beginners are happy about integrated tutorials or interactive help – but at the same time the slicer must of course have sufficient performance for professionals. So the search is on for the famous “egg-laying lizard” that, in the best case scenario, is also available free of charge.
➡ Interested in 3D models? Discover 3D print templates and STL sources
The 8 most important settings that a good slicer should be able to handle
For later printing, the CAD model must be prepared from very specific points of view or provided with additional information. The eight most common settings that every good slicer should be able to handle are:
1) Layer Height
This setting defines the layer thickness of the print model and thus the resolution. The thinner the individual layers can be printed, the more details and softer edges the printed model will reveal afterwards. The following applies: Thinner layers increase the duration of the print! If you want to print models that can do without a lot of detail, you can increase the layer thickness accordingly.
2) Shell Thickness
Shell Thickness defines the thickness of the outer walls of the printed model. The thicker the outer walls, the more stable the model.
3) Retraction
This setting tells the printer when to stop dispensing filament during printing. This feature is especially important when printing interrupted surfaces.
4) Fill Density
This setting can be used to define whether the model is completely filled with filament inside or printed hollow. The higher the degree of filling, the more resistant and heavier the model – but also the more expensive in print. For models that serve purely decorative purposes, a fill density of 10 – 20 % is recommended. Functional models, on the other hand, should have between 75-100% fill level inside.
5) Print Speed
The printing speed specifies the feed rate at which the extruder is moved in the individual axes during printing. Of course, everyone wants to have their print in their hands as quickly as possible, but the quality of the print decreases as the speed increases. A recommended middle ground is a feed rate of 50mm/s.
6) Supports
The “supports”, or support structures, keep overhangs on models in shape during printing. All constructions whose overhang exceeds an angle of 45° must be provided with such additional structures until the filament hardens after printing. The slicer should be able to automatically calculate and add these support structures to the model.
7) Platform Adhesion Type
This function determines how the model is attached to the build platform. In Raft, the bottom of the model is printed with a horizontal grid. This ensures that the model can be easily detached from the platform – but in the same course, the function leaves sharp corners and edges. The Brim function is different. Here fine lines are realized on the outer edges of the bottom of the model. This feature connects the model to the build platform much more reliably, but is also more difficult to detach.
➡ Info on good adhesion to the print bed: Pertinax as 3D printing substrate
8) Initial layer thickness
This function determines the thickness of the first printed layer. This allows the base of the model to be precisely defined.
And what exactly does the G-code do now?
3D printers need an understandable language to print a model from the geometric shapes provided by the CAD program. After all, the CAD model only specifies what an object looks like – but not which axes of the printer should be moved when, where the zero point of the build platform is, and how much filament should be extruded per layer. This is exactly where the G-Code comes in.
The slicer acts as a translator and converts the 3D model from the CAD program into printer-understandable instructions. At the same time, the 3D slicer extends the code with printer-specific data defined by the manufacturer for each printer. Unfortunately, this means that a G-code created for printer A will not work with printer B without restrictions. Therefore, it is more than beneficial to have some familiarity with the G-code in order to be able to adapt and improve it if necessary.
Roughly speaking, the G code is divided into G and M commands. G commands mainly define the movements, M commands control printer-specific properties such as temperature at the extruder nozzle or similar.
➡ More info about G-Code with many examples: G-Code commands in 3D printing
What 3D slicer software is available?
Now let's get to the essentials, namely the slicer software. The market here is now just as large as for CAD software. There is the right software for every need and budget. We have therefore focused on the most common programs.
CraftWare
The completely free CraftWare software is not considered one of the most powerful programs on the market for nothing. CraftWare processes STL and OBJ files effortlessly. The integrated G-Code Visualizer allows convenient viewing of the models layer by layer and, of course, modifying them. The algorithm of the software optimizes the traversing instructions for the printer so that the fastest printing results with optimum quality can be expected.
- File formats: STL and OBJ
- Export files:.gcode
- Operating system: Windows, Mac, Linux, Android
- Price: Free of charge
Download:
Cura
The slicer software Cura from Ultimaker is also offered free of charge as an open source program. Advantage: Cura is also completely available in German. Cura processes STL, OBJ and 3MF files and converts them to G-code. The 3D printer can already be set up during software setup, which simplifies or even eliminates the need for subsequent adjustments to the G-code. Cura allows convenient viewing of the models from different angles. The software is extremely comfortable to use and suitable even for beginners.
➡ More info about Cura from Ultimaker: Ultimaker Cura
- File formats: STL, OBJ and 3MF
- Export files:.gcode
- Operating system: Windows, Mac ,Linux
- Price: Free of charge
Download:
KISSlicer
The KISSlicer is aimed at hobby designers and those who want to become one. The software was developed as a one-man project by Mr. Jonathan Drummer and enjoys steadily growing popularity in the 3D hobby scene. The basic version is free of charge and allows to control printers with one printhead. For more complex projects with several objects to be created at the same time, it is recommended to purchase the Pro variant, which is available for an inexpensive 30 Euros. KISSlicer processes STL data and converts it into G-code. Extensive setting options and simple operation characterize this software.
- File formats: STL
- Export files:.gcode
- Operating system: Windows, Mac, Linux, Raspberry Pi
- Price: Free of charge (Pro version approx. 30 Euro)
Download:
Slic3r
Slic3r is another free program for creating G-code from CAD files. Slic3r processes STL and OBJ files and outputs them in the common .gcode format. As a rather rare feature among free slicers, Slic3r brings the possibility of the Brim mode, which creates a small border around the models, which provide more stability. Also, individual print heads can be controlled during printing. Slic3r is clearly aimed at advanced and professional users, beginners could easily reach their limits due to the scope of the program.
- File formats: STL, OBJ
- Export files:.gcode
- Operating system: Windows, Mac, Linux
- Price: Free of charge
Download:
Makerbot Print
The Makerbot is also offered for free download. The software enables convenient and efficient preparation of CAD data for printing, allows clear management and sharing of objects. In addition to native CAD data, complete assemblies or parts thereof can also be imported. For larger teams, integrated cloud management is ideal. Here, several connected 3D printers can be controlled and monitored via live cameras. Makerbot is also suitable for beginners.
- File formats: STL, OBJ
- Export files:.gcode
- Operating system: Windows, Mac
- Price: Free of charge
Download:
Repeater
Repetier is another free slicer software. Repetier supports multi-extruder support with up to 16 extruders and includes four different slicers (Slic3r, Slic3r Prusa Edition, CuraEngine and Skeinforge) as standard. Interesting feature: Repetier can be connected to a server and allows control of 3D printers regardless of the user's location. The program interface, which is not always easy to understand, and a nested menu structure clearly make Repetier a software for advanced users and professionals.
- File formats: STL, OBJ
- Export files:.gcode
- Operating system: Windows, Mac, Linux
- Price: Free of charge
Download:
Simplify3D
Around 140 euros are due for the Simplify3D software. In return, the user gets a suite that can easily import digital models and convert them to G-code within seconds. Simplify3D also provides insight into the subsequent print frequency thanks to interactive preview, so that changes can be inserted before printing begins. Simplify3D supports multi-part printing, multiple processes within one print, and dual-extruder control. Support structures can be added with a mouse click. According to the manufacturer, Simplify3D can be used with more than 90% of currently available 3D printers. The suite is aimed at beginners and professionals alike.
- File formats: STL, OBJ, 3MF
- Export files:.gcode
- Operating system: Windows, Mac,
- Price: $149
Download:

- Simplify3D Vollversion, 1 Lizenz Windows, Linux, Mac 3D-Drucker Software
- Inhalt: 1 Stück
* Stand: 2024-04-21 / Bilder: Amazon API
MatterControl
Also a suite, but free, is the open source project MatterControl. MatterControl allows you to design, slice, organize and manage 3D printing. Importing STL and OBJ data is just as easy as creating complex objects directly in the suite. The most common models of 3D printers are supported – whether your own model is supported can be found on the manufacturer's website. The suite is easy to use and impresses with its graphically appealing user interface.
- File formats: STL, OBJ, 3MF
- Export files:.gcode
- Operating system: Windows, Mac, Linux
- Price: free of charge
Download:
IdeaMaker
IdeaMaker is another free program for conveniently creating slices for 3D printing. IdeaMaker offers extensive repair functions, automatically generates support structures and is compatible with most FDM 3D printers. Practical features such as automated separation of parts into assemblies or auto-layout of multiple parts are part of IdeaMaker's standard scope. IdeaMaker is recommended for beginners and professionals alike.
- File formats: OBJ, IL
- Export files:.gcode
- Operating system: Windows, Mac, Linux
- Price: free of charge
Download:
Preform (Formlabs 3D Slicer)
Last but not least, let's take a look at Preform. Preform is a slicer specifically for printers from Formlabs. Using the one-click print function, models are automatically oriented, support structures are added and the arrangement is defined. Since Preform is vendor-specific, sending files is a real breeze. Various layout tools simplify importing, reproducing, aligning, enlarging or reducing the digital models. Anyone who owns a printer from Formlabs is well advised to use Preform.
- File formats: OBJ, STL
- Export files:.form
- Operating system: Windows, Mac, Linux
- Price: free of charge (but only suitable for Formlabs printers)
Download:
Conclusion
Nothing works in 3D printing without a good 3D slicer. Slicers are important translators to turn CAD files into machine-readable G-codes. In this case, good software does not have to be expensive! Free programs in many cases have the same performance as their paid counterparts. Those who rely on open source can be sure of having the latest versions and thus convincing performance at their disposal at all times, even in the future.